Rotor Balancing

ABSTRACT
Unbalanced mass on rotary system cause unnecessary vibrations in the system and sometimes the vibrations are too large that they can damage the system. An unbalanced rotational system typically results in vibrations on the entire system and hence affects its normal working. Hence, while imbalances are insignificant for applications where rotational velocities are low, the thus induced vibrations in fast rotating systems can be catastrophic. In this experimental research work the rotor balancing apparatus is used to balance the rotor system by adding additional masses of unknown magnitude. The mass and position of unknown masses would be calculated using theoretical balancing principles.
Introduction
In engineering designs of moving part machines the most common engineering problem is the existence of vibrations in the machine. Vibrations in any machine such as steam turbine or multi cylinder internal combustion engine are very common problem and they must be removed or at least minimized. The source of any vibration in the system is misalignment or unbalanced systems. Unbalance is the most common source of vibration in rotary machines [1]. The unbalance in the rotary machine is not necessarily because of the addition of extra mass on the rotating part but it can come from the uneven mass distribution in any rotary part. Therefore it is necessary to balance out this uneven mass so that the resultant vibrations could be minimized [2]. For balancing unbalance masses on the rotary system more masses can be added at precise locations (angles) and with correct magnitude. In this lab following the theory given in the lab manual we will see how to determine the position and magnitude of added masses to get balancing.
For a balanced system the sum of moments of all these mass with respect to mass 1 should be zero.  By finding moments of each balance, drawing vector diagrams and using above equations, the angular position and the horizontal position of the balances can be determined to achieve dynamic balance.

Simple Rotor Balancing
As per instructions about the experiment there are three different masses attached to disk. The masses are 1 Kg, 0.5 Kg and 0.7 Kg in weight and their respective radiuses are 120 mm 100 mm and 80 mm from the disk center axis. This system is imbalance and in order to balance this system one more mass must be added at the distance of 60 mm. The unknown mass is called Md. Now the task is to calculate the required masses and their respective angle from horizontal plane in order to make this system balance statically and dynamically.

Mass
Radius
M*r
1
120
120
0.5
100
50
0.7
80
56
Md
60
60 Md

60 * Md = 143

Md = 2.4 Kg

Mass of 2.4 Kg is required to balance the system at an angle of 208 degrees counter clock wise from point A

As per instructions about the experiment there are two different masses attached to an arm of a shaft. The masses are 5 Kg and 3 Kg in weight and their respective radiuses are 20 mm and 30 mm from the shaft center axis. This system is imbalance and in order to balance this system two more masses must be added at the distance of 50 mm. The two unknown mass as are called Ma and Md. The respective distances masses from each other is resented as the mass A comes first in the line and after that mass of 5 Kg is present at the distance of 80 mm from the mass A. After that mass of 3 kg is present at the distance of 150 mm from mass A and at last the mass D is present at the distance of 250 mm from mass A. Now the task is to calculate the required masses and their respective angle from horizontal plane in order to make this system balance statically and dynamically.
M mass kg
R distance mm
M*r
X distance from Mass one Ma
M*r*x
Ma
50
50Ma
0
0
5
20
100
80
8000
3
50
150
150
22500
Md
50
50Md
250
12500Md

From the polygon for M*r*x we have
12500Md = 25000
Md = 2 Kg
Mr of point D = 50*2 = 100 at an angle of 58 degree


From the polygon for M*r we have
50 Ma = 105
Ma = 2.1 Kg at an angle of 35 degree

With the help of graphical representation and theoretical calculation it can be said that first mass A has to be of 2 kg and should be placed at the angle of 58 degrees from the horizontal axis. The second unknown mass D should be of 2.1 kg and should be placed at the angle of 35 degrees from the horizontal axis to make system balance statically and dynamically.

Advance Rotor balancing
Rotor balancing experiment kit was used in this experiment performance. In this set up, the circular mass blocks were used. Four masses were used and all of them were of different masses. Additionally, the pulley extension, weight hanger and weights were also used. The weight hanger itself weighs 10 g. Weights of 10 g and 1 g would be 0.0981 N and 0.00981 N respectively.
Figure 2: Measuring moment apparatus set up
                                           
Experimental Procedure:
1.      By exerting the extension pulley the weight was hanged from it
2.      Block 1 was tightened to the shaft at 0 o angle
3.      Weights were hanged from the pulley until the block reached equilibrium at 90 degrees
4.      1 g was added to the equilibrium mass to result in the free fall
5.      The same method was repeated for all other masses and the results are given in table 1
Calculations and Discussions
For block 1
Mass; m = 94 g = 0.094 kg
Weight; 

W = mg = 0.094* 9.81 = 0.922 N

Moment for Weight of block 1; 

M1 = W* r = 0.922* 0.040 = 0.037 Nm

For block 2

Mass; m = 89 g = 0.089 kg

Weight; 

W = mg = 0.089* 9.81 = 0.873 N

Moment for Weight of block 1; 

M1 = W* r = 0.873* 0.040 = 0.0349 Nm

For block 3

Mass; m = 80 g = 0.080 kg

Weight; 

W = mg = 0.080* 9.81 = 0.7848 N

Moment for Weight of block 1; 

M1 = W* r = 0.7848 * 0.040 = 0.0314 Nm

Block 4

Mass; m = 72 g = 0.072 kg

Weight; 

W = mg = 0.072* 9.81 = 0.696 N

Moment for Weight of block 1; 

M1 = W* r = 0.696* 0.040 = 0.0278 Nm

For block 1 and lock 2 initial angles and positions are given as shown in table 2 in the following

From table 1, W1r1 can be drawn on y axis in negative direction (downwards) as shown in figure 3 

(a). Then W2r2 can be drawn at an angle of 110 degrees anticlockwise. The magnitude of these two vectors is calculated by taking suitable scale. The scale is simple multiplier factor of 100. That is 0.037 will become 37 mm on the scale and 0.0347 will be 34.7 mm. the figure 3 has be drawn on scale. The angles are measured using protector for each vector. 

Figure 3: Vector diagram

Now the vectors from figure 3 (b) can be decomposed into component vectors along horizontal and vertical axis and the then following the theoretical principles the following equations can be written as

For horizontal components

-L2*FC2* cos10 + L3*FC3*cos 80 + L4*FC4*cos2 = 0

For vertical components

-L2*FC2*sin10 + L3*FC3* sin 80 - L4*FC4*sin2 = 0

Putting in values 

-0.12*(0.0349)* cos10 + L3*(0.0314)*cos 80 + L4*(0.0283)*cos2 = 0

-0.00412 + 0.00545 L3 + 0.02828*L4 = 0

Now using values in vertical components 

-0.12*(0.0349)*sin10 + L3*(0.0314)*sin 80 - L4* (0.0283)*sin2 = 0

-0.000727+ 0.0309 L3 – 0.000987* L4 = 0

Solving equation (1) and (2) simultaneously

L3 = 0.028m = 28 mm

L4 = 0.1402 m = 140.2 mm

Hence the final results are shown in table 3.

Discussion

This experiment was very helpful to understand the working of rotor balancing experiment apparatus. Initially it looked quite complicated to use the apparatus but finally it was quite user-friendly and easy to get high accuracy in results. Before doing the advanced rotor balancing tow mass, three mass systems were balanced using the same apparatus. The rotor was only run for longer period when it was fully balanced because if it is run on unbalanced condition for longer period it can cause unnecessary wear and tear in the apparatus and can reduce its precision and accuracy. On the apparatus a protractor on the pulley/rotor helps to determine the angular position of the balance blocks. The vector diagrams show that the system was exactly balanced because the vectors exactly match with each other without showing any error in the readings.  
Buckling of Strut Lab Report

In construction applications a column or strut is an element that is used to withstand compressive load. 

Strut is similar to beam but it is used in vertical position and normally horizontal beams are placed on the columns or both ends of beams are rested on two struts on either end of the beam. 

struts are usually designed to withstand high compressive loads and they can fail or buckle if the loads are too large and columns are unable to withstand that load. 

Normally the load at which the column buckles is called critical load and strut is typically designed to be used well below this critical load.

However, even if the structure is subjected to small loading well below  critical buckling load of strut, the continuous application of such loads could eventually fatigue the structure and build up to buckling failure. 

Therefore, understanding the buckling of strut, its characteristics and designing in safety factors are important. In this experiment we will see how columns buckles ate different loads when their ends are fixed or pinned.

Calculating the Buckling of Strut 

The following dimensions of the strut were measured for rectangular strut

Width, b = 100 mm

Depth, d = 50 mm


For rectangular shape column the second moment of area can be calculated as

Second moment of area

I =(bd^3)/12

Putting in values

Second moment of area 

I = 0.05*(0.1)^3/12  = 4.16* 〖10〗^(-6)   m^4


The buckling load for buckling of struct can also be calculated using Euler equation where it can be seen that the buckling 

load only depends on the cross sectional area, material properties such as Young’s modulus ‘E’ and the way both ends are fixed. 

The Euler equation is given by

P =πEI/kL

Where the value of ‘k’ depends how the ends are fixed.

For Pin End Connection

If both ends are pinned then ‘k=1’ will be taken. 

P =πEI/kL

P =(3.14*97*〖10〗^9*4.16* 〖10〗^(-6))/(1*L)

P =272 N

For both fix end connections

P =πEI/kL

P =(3.14*97*〖10〗^9*4.16* 〖10〗^(-6))/(0.5*L)

P =1129 N

If one end is pinned and the other end is fixed then ‘k=o.7’ will be taken. 

P =πEI/kL

P =(3.14*97*〖10〗^9*4.16* 〖10〗^(-6))/(0.7*L)

P =570 N

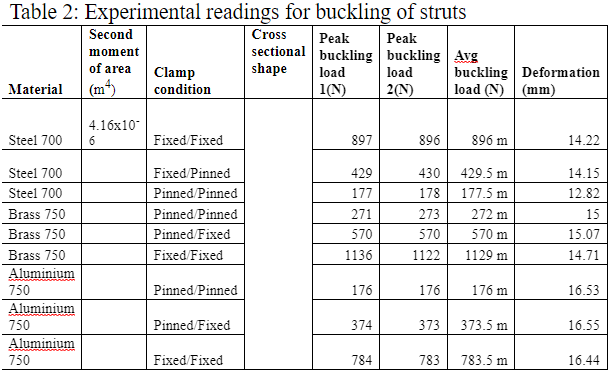
experimental reading for buckling of strut


Discussion on Buckling of Strut 

From the results given in table 2 it can be seen that different struts buckle at different critical loads. The buckling depends on many factors such as the material by which the column is made of and the way by which both ends are fixed or pinned. 

In this case it is assumed that all struts have similar cross sectional areas and therefore have constant value for second moment of area. The columns made of brass and aluminum will have different values of ‘E’ but same value of second moment of area ‘I’ if the cross sectional area is same. 

From table 2 readings it is clear that the struts can take larger loads before knuckling when both ends are fixed. Same is true for aluminum and brass columns. The young’s modulus of brass is 97 G Pa while for Aluminum it is 69 MPa. 

If the second moment of area is same for both struts then the column made of brass should take larger load before buckling given that both ends are fixed for both struts. From table 2 it is clear that the column made of brass buckles at 1129 N load while the strut made of Aluminum buckles at 783.5 N when both ends were fixed. 

From Euler equation it can be seen that the buckling load will be directly proportional to the young’s modulus of the material the strut is made of. Therefore brass is more durable and can withstand higher compressive loads. 

Concluding the Buckling of Strut 

For strut design the maximum bending stress was calculated and also keeping in mind the safety factor the design stress was calculated. It was concluded that the material should be used with yield stress of 75 MPa for a safe design of strut

For strut design the aluminum and brass strut were tested and it was seen that the brass strut has larger capacity to withstand compressive loads for similar cross sectional area and end fixing. 

By considering the calculations given in this report more suitable columns can be designed to be used in underground construction for London underground tunnels. 

STRAIN MEASUREMENT IN BEAM BENDING


Abstract
In this lab experiment the beam design was evaluated for a given bending load so that the best engineering design can be used to design the beam for a given load. In order to evaluate the given design of bean against a given load stress and strain produce in beam when load is applied in it was calculated. Stresses in beam were calculated using theoretical formulas and the deflection was measured using foil strain gauges. Similarly the buckling of columns was also studied experimentally for different ends conditions to evaluate the load bearing capacity of columns made of aluminum and brass.

STRAIN MEASUREMENT IN BEAM BENDING

Introduction
For any load bearing system beams are its main supporting structure which provides necessary strength to the structure. Beam provides the required strength to the structure due to strength of its material and it shape. Shape of the beam defines the second moment of inertia which when combine with the load and point of application of load gives the value of strength a beam can provide to its structure. There are many different types of beams like simply supported beam, continuous beam and over hanging beam were each type can have different types of shapes like square beam, rectangular beam or I beam. From the above mention shapes of beam I beam is the most used beam due to its greater second moment of inertia for given height and width.

In construction work application one of the most important elements used is beam. Beam is used to withstand load which is applied laterally along the length of the beam. The applied load can be a point load which is applied at one single point or it can be distributed load. The uniformly distributed load expands all over the length of beam and acts with same magnitude at all points on the beam. Due to bending load the beam can be deflected downwards under the applied load [1]. This deflection must be measured and analyzed to evaluate the effectiveness of beam towards its load bearing capacity. The deflection in beams can be measured using strain measurement and this is done by using strain sensors [2]. The examples of such strain gauges are foil gauges, vibrating wire gauges, micro electromechanical strain gauges and optical sensors etc. in this experiment the foil gauges were used because they are easy to use and are more economical and produce accurate results.

Experimental apparatus 
Wooden plank
Foil gauges (attached to wooden plank by a glue with good strain transference)
Wheatstone bridge circuit
Oscilloscope or multi-meter
Loads

CALCULATIONS
The following dimensions of beam are given
Load applied; W = 100 kN/m2
Beam length; L = 100 cm = 1 m
Beam width; w = 3.5 cm
Beam Breadth, h = 14.3 cm 

From beam dimensions the second moment of area, ‘I’ can be calculated as 

Second moment of area

I =(wh^3)/12 

Putting in values

I =(0.035* (0.143)^3)/12   = 8.53 x 〖10〗^(-6)  m^4

The beam is assumed to be simply supported and the load is applied at the middle point
For a maximum load of 100 kg 

W = 100* 9.81 = 981 N

For simply supported beam the maximum bending moment will be at the centre of beam where the deflection will be the maximum but the shear force will be the minimum. 

The maximum moment would be 

M =WL/4  =(981*1)/4  = 245.25 Nm 

The maximum bending stress can be calculated as 

Bending stress 

σ =My/I

Where ‘y’ is the distance from neutral axis to the edge of beam and this is equal to half of beam breadth (height) 

so y =14.3/2   = 7.15 cm

Bending stress

 σ =(245.25* 0.0715)/(8.53 * 〖10〗^(-6)  )
σ = 2.05* 〖10〗^6  Pa = 2.05 MPa

For three point test, the flexural strength can be calculated using the following formula 

σ =3LF/(2wh^2 )

Putting in values

σ =(3*1*981)/[2*0.035*(0.143)^2 ] 
σ = 2.05* 〖10〗^6  Pa = 2.05 MPa

This is exactly same as the maximum bending stress in the beam

For uniform distributed load

For this particular case when the load is 100 k N/m2 which is uniformly distributed and the beam length is 2.6 m. Let’s assume the width of beam is 10 cm and height is 20 cm. Then the load on the beam will be 

100 kN/m2* 0.1 m = 10 k N/m

Therefore 

W =10 k N/m

This is uniformly distributed load and in this case the second moment of area would be

Second moment of area

I =(wh^3)/12

Putting in values

Second moment of area 

I =(0.1* (0.2)^3)/12  = 6.67 x 〖10〗^(-5)  m^4

The distance from neutral axis to the beam edge

y =20/2  = 10 cm = 0.1 m

The maximum bending stress can be calculated as 

Bending stress 

σ =My/I

The maximum moment for uniformly distributed load would be 

M =(WL^2)/4  =(10*1000* 2.62)/4   = 16900 Nm

Now

Bending stress

σ =(16900 x* 0.1)/ 6.67* 〖10〗^(-5)
σ = 25.33*〖10〗^6  Pa = 25.33 MPa

This is the maximum stress the beam can take before failure. With a factor of safety of 3 the ultimate stress would be 25.33 x 3 = 76 MPa

W
I
M
Y
stresses
strain
196
0.00000853
49
0.0715
411145.96
2.74097E-05
245
0.00000853
61
0.0715
513932.44
3.42622E-05
491
0.00000853
123
0.0715
1027864.9
6.85243E-05
736
0.00000853
184
0.0715
1541797.3
0.000102786
981
0.00000853
245
0.0715
2055729.8
0.000137049


Discussion

A square shape simply supported beam was used during this experiment and material used for the beam was wood. As per instruction for experiment load was applied on the beam and stresses were calculated using formulas for simply supported beam. Strain was recorded using the strain gauge and Wheatstone bridge. Five different loads were applied on beam and stresses and strain for each of the load were calculated.  Graphs for stress and strain was made against the force applied. According to the graph one which is between stress and force (load) the relation between stress and load is linear and directly proportional to each other. This means that increase in load increase the stress produce in beam and reduction in load reduces the stress produce. This change in stress is equal to change in load as the graph is linear. According to the graph two which is between strain and force (load) the relation between strain and load is linear and directly proportional to each other. This means that increase in load increase the strain produce in beam and reduction in load reduces the s strain produce. This change in strain is equal to change in load as the graph is linear.