Understand the material hardness and the effect of carbon content and heat treatment on hardness
This lab work aims to understand the material hardness of different materials and effect of carbon content present in the material on material hardness and the effect of heat treatment of material on material hardness.
To achieve the aim of this lab work the following mentioned objectives have to be completed in said sequence
1. Develop a comprehensive understanding of methods used for measuring material hardness
2. Develop a comprehensive understanding of the effect of carbon percentage on material hardness
3. Develop a comprehensive understanding of the effect of heat treatment on material hardness
4. Perform a hardness test to measure material hardness
5. Perform hardness test after increasing carbon content
6. Perform hardness test after heat treatment of material
7. Develop a comprehensive conclusion about the work
Material Hardness
Material hardness can be defined as the material's ability to resist indentation. In more de, tail it can be defined as the material's ability to resist localized plastic deformation which is in the shape of indention and scratch.
Material hardness is also a great way to understand material wear resistance as it is observed that the greater the material hardness greater the material wear resistance.
Another important relation of hardness with the material is that the material hardness is roughly proportional to material strength.
Material Hardness Testing
Material hardness tests are very simple, easy, and straightforward to perform as the only thing needed to be done in a material hardness test is to produce a dent in the material and then the force or load needed to produce a dent in the material is used to measure the material and hardness.
Hardness measured during the experiment is usually a dimension less number only that defines the level of hardness of material means hardness is a unit less quantity.
Hardness tests are destructive tests by the nature of the f testing material but in some cases, these tests can be considered non-destructive tests as they only create a small dentmaterials'ssl's surface and the material can be used in any way possible after the test.
There are three different hardness testing methods namely as
- Brinell hardness test
- Rockwell hardness test
- Vicker hardness test
differenceconsciencee in the type of hardness test is based on the type of indenter used in the experiments, the load applied during the experiments, and how the load is applied during the experiment.
There are three different types of indenters used for the hardness test. F first is the ball indenter made from steel and has a diameter of 10 mm in most cases. Second is the diamond cone and third is a diamond pyramid.
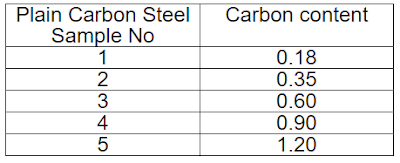
To check the effect of carbon content and heat treatment on the material, different samples of material are provided as per below mention details
For checking carbon content
 |
| Material Content |
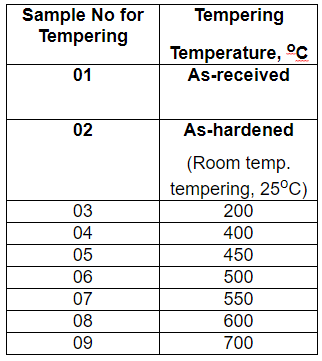
For heat treatment
- As-received sample
- The sample hardened at 1300 C and quenched
- Samples were quenched and tempered for 1 hour at various temperatures from 200 C to 750 C.
 |
| Temperature Effect on Material |
- The first step is the setting up of the apparatus for the experiment and this includes ensuring that the apparatus is placed on a horizontal surface, no initial load is applied on the machine, and related indenter is installed properly
- The second step is preparing the sample for the test and that includes making a clean horizontal surface with dimensions as per the standard provided.
- The third step is to place the sample material on the anvil of the machine in a manner that it is directly below the indenter
- The fourth step is to move the elevation screw of the machine to move the anvil up so that the indenter and workpiece almost touch each other
- The fifth step is to select the load as per the type of indenter and then apply the load for a few second
- In the case of Brinell hardness and Vicker hardness manual readings of the dent diameter and diagonal end will be taken respectively and they will be used to calculate the respective hardness number. In Rockwell's case, the hardness number will be available directly on the screen of the machine
- Repeat the process for different samples of the material provided for the test and record the data of each material in the table provided

Figure 4 Vicker hardness and tempering temperature
Different material samples were prepared at different tempering temperatures, to check the effect of tempering temperature on material Vicker hardness.
The hardness Value of each sample was recorded and noted again in the respective temperature column present in the table provided.
Graph four was generated for the effect of temperature on Vicker hard with temperatureurer h o the x-a s and Vicker hardness on the y-axis.
The Graphsshowsw that an increase in tempering temperature has a very sharp effect on hardness lately where hardness increases very sharply. This sharp increase in hardness is at 500 and550 degrees temperature and after that 600 and 700 degrees temperature hardness start to decrease steadily and continuously.
An increase in material hardness is because temperature removes the internal stress and allows the material to have stronger bonds between atoms but this is up to a certain limit after that increase in temperature makes the material soft which reduces hardness.
Conclusion on Material Hardness Test
This lab work aims to understand the material hardness of different materials and effect of carbon content present in the material on material hardness and the effect of heat treatment of material on material hardness.
To check the effect of carbon content and heat treatment on the material, different samples of material were provided with the following carbon contents (in weight %): 0.18, 0.35, 0.60, 0.90, 120, and samples hardened and quenched at 1300 C and set of samples tempered and quenched for one hr at temperatures ranging from 200 C to 700 C.
The graph shows that with an increase in carbon content in the material the hardness of the material increase but this increase is up to a certain limit and after that material, hardness start to decrease.
This is because steels that have more than 0.8 percent Carbon, have a combination of cementite and pearlite in it. When more carbon is added to steels, cementite is formed and is brittle but hard, so it increases the hardness of the material.
The Graphs show that an increase in tempering temperature has a very sharp effect on hardness lately where hardness has increased very sharply.
This sharp increase in hardness is at 500 and 550-degree temperature and after that for 600 and 700-degree temperature hardness start to decrease steadily and continuously.
An increase in material hardness is because temperature removes the internal stress and allows the material to have a stronger bond between atoms but this is up to a certain limit after that increase in temperature makes the material soft which reduces hardness.


No comments:
Post a Comment